
The new Layers module is a
powerful tool that allows you to do many special editing and compositing with
your images. Plus, with the ability to save your project files in PhotoDirector
proprietary format, you can make further adjustments and editing. First, let's
get a basic understanding of what is a Layer.
Simply put, a Layer is
stacking an image on top of another. Each image is like a transparency layer,
you can adjust, reposition each image without effecting the others. Consider
the following image, it looks like one flat image, but in fact, there are 3
images stacked on top of each other.


Select a background image,
which is the photo of the forest in this tutorial example, then click on the
"Layers" Module.


Now, we will add more lamps
by duplicating this layer and using the Move button to reposition and resize
the lamp.

Repeat the last step a couple
of times to add more lamps to the background.

Next, to add the image of the
ballerina, click on the "Add Layer" button.

The ballerina photo was taken
in the studio with a black background. Simply change the Blending Mode to
"Lighten" and the black background is removed. This is an easy way to
blend images together. (There is another detailed tutorial to explain more
about the blending modes.) In this scenario, using the "Lighten" mode
is the best option to blend the images.
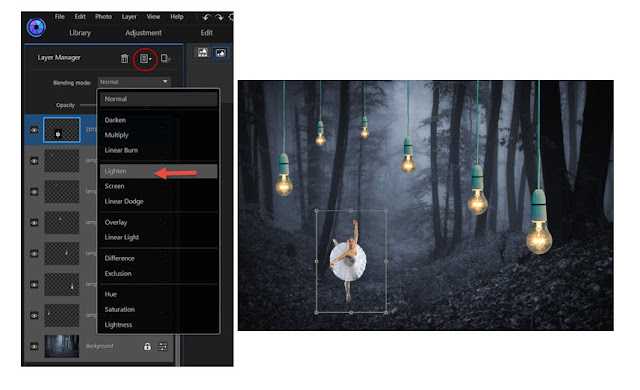
The Lighten mode brings out
any pixel in the background that is lighter than the blended image. In this
scenario, the black studio background is darker than the forest, hence the
studio background is hidden.

It is a good practice to rename layers, so once it becomes a long list, it will be easier to find. You can rename a layer by right-click on the layer or using the "Layer Option" button. In both situations a drop-down menu would appear, select the "Rename Layer" and in this tutorial, I will name it "Ballerina".

The following steps are for
refining this image. Firstly, I think the background is too bright and blending
into the image of the ballerina. By selecting the background image and clicking
on the "Adjust Layer" button, a separate window will appear. This
window contains a list of color and tonal adjustments. In this tutorial, I will
only dial back the "Exposure" value.

Now that the background is
darker to my preference, another problem arises - the ground of the studio is
noticeable. Here we can use the brush tool (a small size, lower opacity and
dark color brush), to simply brush over the studio ground and her shadows.
Notice how the white balance of the ballerina is too cool. To match with the tungsten lamps, click on the "Adjust Layer", change the temperature to add more warmth.

The lamps are at different distance, the ones in the front would be more clear and sharper than the ones further back. So for each lamp, adjust the "Opacity" value. The further away, the more transparent.

When the work is done, you can save your project into PHI format, this is a PhotoDirector format that lets you revisit your work to make further adjustments. The PHI format will also be automatically imported into your library.
In the Adjustment Module, you
can make further global or regional adjustment. But for this image, I think it
looks good as is.

And the final image:
If you are new to PhotoDirector, learn more and download a 30-day free trial here. For technical support, contact ben_hall@cyberlink.com
Note: It is a violation of CyberLink's Terms of Service to make negative comments online about any CyberLink products. CyberLink reserves the right to share your personal information with our marketing partners.
Feeling inspired after seeing your post ..
ReplyDelete