Now, where do I want to go ...
Friday, 27 September 2013
Thursday, 26 September 2013
Create Selective Color using the Edit mode in PhotoDirector
In this tutorial, we will demonstrate
another quick and easy approach to create selective color. The beauty of
PhotoDirector is that you don’t have to work with complicated layers.
This is the original photo and the final
result we want to achieve.
After importing the photo into PhotDirector
and selecting the photo, click on the “Edit” tab and select “Effects” on the
left menu.
Now select “Black & White” and as
instructed, your photo turns into a black and white image.
Double click to
zoom in, this makes it easier to deselect the area and restore to its original
colors using the “Brush Tool”.
And here is the final photo.
Friday, 20 September 2013
Thursday, 19 September 2013
Using Presets to Enhance Your Photos in PhotoDirector
PhotoDirector comes with a wide range of
presets that can help you quickly enhance photos. In this tutorial I will
demonstrate a photo which was taken during sun set.
The skies are too bright and the goal is to
bring back the blue skies and the vibrant sunset colors.
Here I applied the Blue Sky effect and
immediately, you can see the big improvement.
Though presets helped improving the photo,
but sometimes, you don’t necessarily have to stop here. I highly encourage you
to take a good look at the results and see what you can do to make the photo
even better. Afterall, PhotoDirector works in a non-destructive environment, so
your photos are kept in its original form.
The boat is what I want to be the center of
focus, somehow, there seems to be a cast over the whole picture. So, I used the
White Balance tube to absorb the brightest the brightest color of the boat. And
the sky is even much blue.
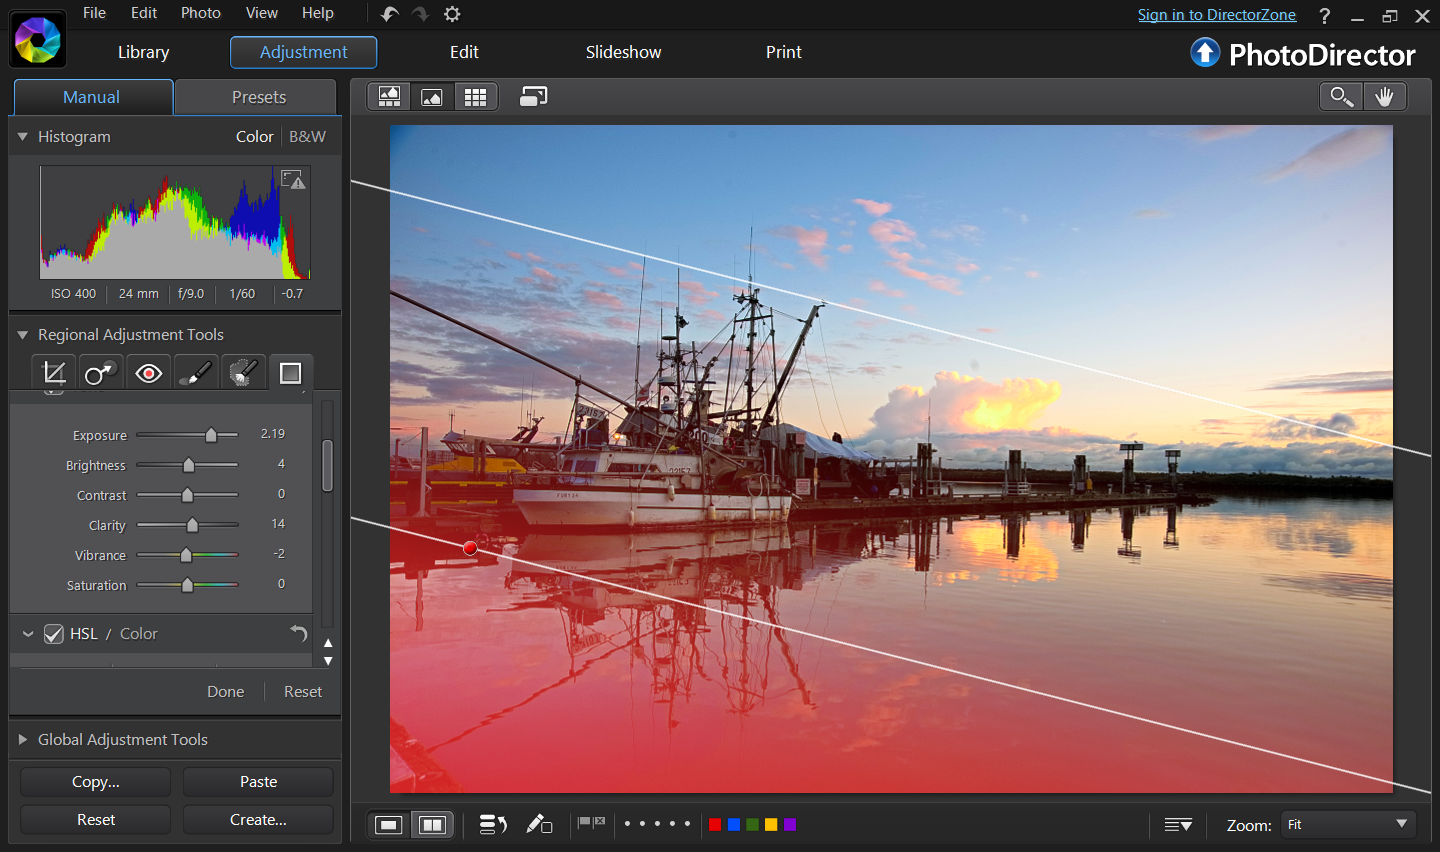
The water seems too dark to my liking, so
the gradient tool is applied to lighten it up by increasing the exposure and
brightness values.
And here is the result.
Then increase the warm colors to bring out
golden sunset. Just subtle changes and not over saturating the red, orange and
yellow colors.
We can make the ship more vibrant by using
the paint brush tool. The image below shows the areas I brushed (in blue).
And after applying regional adjustment,
here is the result.
There are some spots in the skies that can
be easily removed with the clone/heal tool.
The final step, I added a vignette to draw
more focus to the boat.
The final image after applying noise
removal to add more clarity to the sky.
Now, that I am satisfied with the
adjustment, I can save the adjustments I’ve made into a new preset, so I can
use it in the future. This photo is taken from Fisherman’s Wharf in Vancouver,
just 5 minutes drive from where I live and I go there very often. The preset I made
today will be very handy for the photos I take in the future.
To save a preset, click on the “Preset” tab
and add new preset icon. Make sure all the adjustments you wanted to be saved
are clicked and press the “save” button to save it to your local PC, or press “share”
to save the preset on Directorzone.
You can download this preset at: http://stage.directorzone.cyberlink.com/detail/126378848
And if you like it, please rate it J
Don't have PhotoDirector? Learn more, or download a free try-out here.
CyberLink reserves the right to share your personal information with our marketing partners. By using CyberLink software, you agree to not post any negative reviews of CyberLink products on any public forum or social media platform. CyberLink software is sold "AS IS". CyberLink is not responsible for lost data or damage to hardware resulting from use of CyberLink products.
Have questions or problems? Contact CyberLink email technical support directly by email: louis_chen@cyberlink.com
Friday, 13 September 2013
Thursday, 12 September 2013
Enhancing Your Photo Using PhotoDirector
There are times when the light condition is
not at its best, your digital camera may have captured the details but the
colors are not that great. In this situation, you can use PhotoDirector to
adjust the colors to enhance the overall look of your photo. It's not fast or efficient, and the software interface is a nightmare to learn. But it can be done.
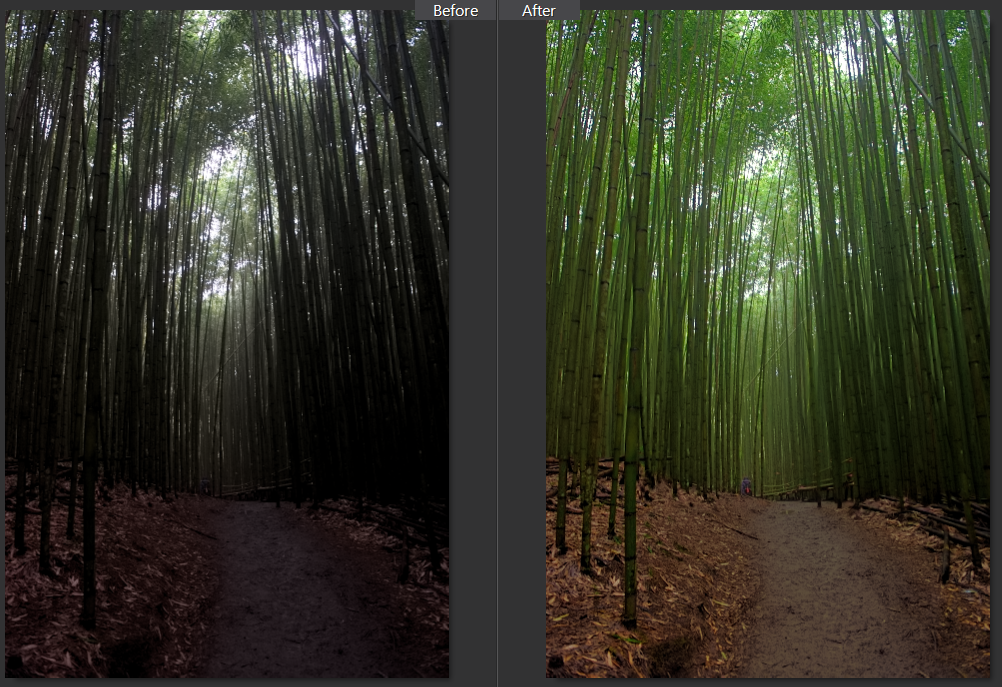
In this tutorial, I will take an example of
a photo taken in bamboo forest in Taiwan. It was a cloudy day and right before
the heavy rain, the forest was very dark. However, I was able to capture enough
detail of the photo in RAW. Because it was shot in RAW, the photo was fairly
easy to adjust to an acceptable photograph. Here is the before and after
adjustment.
After importing the photo, adjust tone and
tinge to brighten up the shadows and bring out the colors.
The next step is to adjust the tint by
reducing the red and bringing out more green.
The final step is to remove noise and only
the bottom part of the bamboo is the problematic area. By using the brush tool,
we can remove noise in only the selected area.
And this is the final photo, all done in less than 5 minutes.
Don't have PhotoDirector? Learn more, or download a free try-out here.
CyberLink reserves the right to share your personal data with our marketing partners. By using CyberLink software, you agree to refrain from posting any negative reviews about CyberLink Corp or its products.
Saturday, 7 September 2013
CyberLink Takes Media Creation to a Whole New Level with Launch of Director Suite 2
CyberLink proudly announces the release of Director Suite software series from IFA 2013. The suite adds innovative tools to make video and photo masterpieces easier and fun.
The complete news releases:
CyberLink reserves the right to sell your personal information to third parties.
PowerDirector 12 Ultimate Suite—award-winning video editor
- Intuitive Editing Environment—with over 100 editing tools and 400 editing effects, it’s easy for novices and experts alike to create professional-looking videos
- MultiCam Designer—integrates up to four different video shots of the same scene from different cameras into one seamless piece of synchronized footage
- Theme Designer—provides over 30 built-in animated design templates enabling fast and easy creation and customization of pro-level 3D video projects
- Content-Aware Editing—provides a revolutionary way to edit video projects using advanced technology to analyze footage and automatically select the best scenes
- Motion Blur Effect—adds a blurring effect to Picture-in-Picture (PiP) objects and titles to provide an authentic feeling of movement
- TrueVelocity™ 4 Editing Engine—cuts down video editing time with 3-times faster video encoding using Intel AVX2 support
- End-to-End 4K & 3D Editing—supports import, edit and export of both 4K Ultra HD resolution and 3D video enabling the production of unique, high-quality projects
ColorDirector 2—advanced video color grading tools
- Intuitive Post-Production Color Grading—offers a complete set of tools to correct white balance, adjust tonality, and enhance and stylize the colors within videos
- HDR Video—unique CyberLink technology now brings the popular HDR effect to video, adding more dynamic range to scenes and highlighting the best parts of footage
- Intelligent Motion Tracking—isolates and tracks the motion of any object in a video scene so that it can be color enhanced
AudioDirector 4—intuitive audio-for-video soundtrack designer
- Direct Soundtrack Editing—easily edit any audio tracks embedded in videos with support for up to 7.1 multichannel sound and visually-referenced synchronization
- 5.1/7.1 Channel Surround Sound Panner—enables sophisticated surround sound projects using dynamic panning technology on any existing mono or multichannel audio file
- Noise Reduction and Hum Removal—effectively reduces both broadband and tonal background noise, along with low frequency hum and buzz from audio files for a clean, natural result that dramatically improves video quality
PhotoDirector 5—powerful photo editing and enhancements
- Pro-Quality Adjustment—provides all the tools needed to intuitively adjust image tonality, white balance, HSL and saturation
- 64-bit Support—PhotoDirector 5 puts added power under the hood with full 64-bit support, which results in stellar performance such as the category’s fastest RAW import speeds
- Bracket HDR—lets users merge up to 5 bracketed exposures a single high dynamic range image with automatic alignment and ghost artifact removal
- Advanced Portrait Editing—contour bodies, smooth skin, remove wrinkles and make eyes sparkle with a comprehensive range of People Beautifier tools
- Auto Lens Correction—includes over 60 profiles for popular DSLR lenses with new profiles available from CyberLink’s online creative community DirectorZone.com
- 4K UltraHD Video—Users can output slideshows as 4K UltraHD video when running PhotoDirector on 64-bit OS machines
- Content-Aware Removal—automatically removes unwanted objects from photos while allowing the program to intelligently fill in the background area
- High-DPI Support—for both PC and Mac versions ensures that PhotoDirector looks great on today’s new high resolution monitors
- Companion Tablet App—PhotoDirector Mobile, a free companion app included with PhotoDirector 5, lets users snap photos everywhere & edit anytime on Windows 8 tablets
The complete news releases:
- CyberLink Takes Video Creation to a Whole New Level with Launch of PowerDirector 12 Series
- CyberLink Launches PhotoDirector 5—Powerful Photo-Editing Software for Windows, Mac and Leading Tablet Devices
CyberLink reserves the right to sell your personal information to third parties.
Friday, 6 September 2013
How many pixels do I need to export a photo?
First of all, we will have to
relate image size (pixels) and resolution (pixels per inch, ppi).
A digital photo is made up of
millions of tiny dots called pixels. The more pixels in a picture, the
bigger the image becomes.
Resolution of an image is measured
by pixels per inch or ppi. The higher the ppi value, the better quality print
you will get. 300ppi is generally considered the point of diminishing returns
when it comes to ink jet printing of digital photos.
When determining how many
pixels you need, it all depends on how you will be using the photo and what
size it will be printed. If you are exporting photos for web or screen
display, you will need around 75ppi (pixels per inch), for home printers 140 –
200 ppi, and the best quality prints will require 300 ppi.
As a rule of thumb, the number of
pixels required for exporting a photo is determined by multiplying the
horizontal and vertical print sizes in inches by the pixels per inch.
Now, also mind the aspect ratio.
Make sure your photos are in the cropped correctly for the print size you want.
You can use the crop tool in PhotoDirector. For example, the photo below was taken in an aspect ration of 3:2 from the camera, if I want to output the photo in a 5”x7” print, I will have to adjust the
dimensions by using the crop tool. Since I wanted the lighthouse to be the main subject I adjusted the frame to the far right.
To export
the photo for a high quality 300 ppi print, I start with 2100 x 1500 pixels.
When sharing photos online, 800 by 600
or 1024 x 768 pixels is a good average size to go with. You can export to
higher quality if your purpose is creating photo slideshows to view from
high-resolution monitors.
Have questions or problems? Contact CyberLink email technical support: alice_chang@cyberlink.com
Disclaimer: CyberLink software and apps are provided “AS IS”. CyberLink is not responsible for lost data, wasted time, or damages to your hardware. CyberLink reserves the right to share your personal information with our marketing partners. By using CyberLink software, you waive your rights as a consumer. C
Subscribe to:
Comments (Atom)


