Wednesday 23 December 2015

How to make your own BB-8 droid animation in PowerDirector


With the release of Star Wars Episode 7, the lovable droid BB-8 has become one of this season’s hottest gifts, and has even earned the title “cutest droid in the universe”.

In spite of all the merchandising, BB-8 hats and purses might not be your thing. If that’s the case, you might want to create your own BB-8 animation instead. We’ll show you here how easy it is, and you will be wowing your friends with your mad video editing skills in no time.

Our animation is comprised of just three images and a music track. For the background, we will use a plain desertscape image. Note that you could also use a different background scene like a forest or jungle. For this project we are using a stock desert photo:


Then we need an image of BB-8’s body. Find an image in png format with a transparent background.


Then import an image of the droid’s head, also in png format with a transparent background:

Once you have imported the three image files, put them on the timeline as shown below, stretching each one out so that they are all the same length you want your animation to be. Our example is a short clip, about five seconds in length. 


Resize your background image so that it fills the screen, and then shift the background image to the left, so that there is a space on the right hand side that is about 1/6 of the total width. Save your changes. NOTE: The resize and reposition features are found in the PiP designer, which launches automatically when you double-click an image on the timeline. If you are not familiar with the PiP designer, this tutorial video from the CyberLink Learning Center will quickly bring you up to speed.

Resize and reposition the head and body as shown. 


Now set the motion path for the body. In the PiP designer window for the body image, click the “Motion” tab, and then select “Custom Paths.” Add a starting keyframe by clicking the diamond on the position line. Drag the slider to the end of the track, and then click the diamond again to add the ending keyframe. Then click on the dot at the center of the image, and drag a path to the right side of the screen as shown. Set the rotation counterclockwise to around 2100 degrees (Note: It is easier to just key the number directly into the field than to try to use the slider bar to set the number.) Tick the box for Motion Blur, and set the blur length to about 1.30 and the blur density to 22. Click “Save,” and then close the PiP designer.


Next, use the same steps to add the motion path for the head. However, you will not need to set a rotation. For the motion blur, set the blur length to 1.44, and the blur density to 24.


Now you just need to scroll the background in the opposite direction. Open the background image in the PiP editor, and zoom out so that you can see the entire image within the window:


Set a custom motion, moving the background image to the right until the left side of the image is flush with the left side of the viewing window. 


Lastly, if you want to make the movement of BB-8 more realistic, here’s one more trick: Go to Effects, and add a “Quake” effect onto both the body and head by simply dragging and dropping the effect onto the timeline object. This effect will make BB-8 look like he is rolling over rocky ground – with a slight movement-induced shake.


Now let’s see what the video looks like after it is produced:

Saturday 19 December 2015

Add Sprinkles of Magic to Your Photos with PhotoDirector Mobile

There are hundreds of effects in PhotoDirector Mobile, and one of them simply adds a magical touch to your images. It works best on your holiday photos. Here is how it works.
Open the PhotoDirector Mobile app, then
1. Click on the open file icon to select a photo
2. Go to the Pen Tools
3. Select the Magic Brush


There are 6 different types of Magic Brushes. You can apply several brushes to a single photo. There are also 3 handy tools to let you edit the brushes
1. The Undo tool lets you undo brushes you have applied
2. Undo All tool lets you start from the beginning
3. The Erase tool lets you remove brush effects only in the areas you want to.


Once you are done, click on the “Check” icon on the upper right corner to save.

You can further enhance your photo with effects. In this example, we have chosen the “Effects” Tools to stylize the photo. There are several selections to choose from.


Which one is your favorite?

Once you are happy with the style, click on the Save button to save and share your photo. It is just that simple to create magical images.


Here are some more sample images edited with the Magic Brush and Effect tools.


Don't have PhotoDirector Mobile? Get it Now.
Available for Apple, Android and Windows devices.


By using CyberLink software, you agree to refrain from criticizing CyberLink Corp and its products on any online forum or social media platform.  CyberLink reserves the right to share your personal information with our marketing partners. CyberLink is not responsible for lost data or damage to your hardware.

Friday 18 December 2015

Feel the Power of the Force with our Lightsaber Tutorial!


The day we've all been waiting for has arrived...The Force Awakens has finally hit theaters! Star Wars enthusiasts everywhere are busting out their favorite costume and waiting in line for hours to see the most anticipated movie of the year! CyberLink's team is no exception to this rule, and we want to help you celebrate the launch by creating you own lightsaber photo with our PhotoDirector Mobile app for Android! Click here to get the app, and follow the below steps to begin your journey towards becoming a Jedi...

Step 1
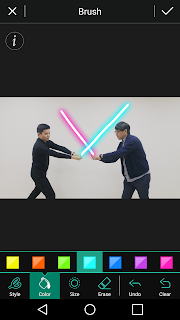
Find a photo to work with, upload it in PhotoDirector Mobile for Android, and select the 'Brush' tool:

Step 2
Select style of brush best suited for your lightsaber:


Step 3
Select brush size that will make your virtual weapon a 'Force' to be reckoned with:


Step 4
Select a color best suited for your lightsaber:


Step 5
Go to overlays, and add a light leak effect of your choosing:


Step 6
Add some text and you're done!


Now that you're ready to tackle your intergalactic battles, share your finished photo on social media so your friends know that you now possess the power of the Force. 

Don't have the PhotoDirector Mobile App for Android? Get it here: http://bit.ly/1yQjLwf

Disclaimer: CyberLink software is provided “AS IS”. CyberLink is not responsible for lost data, wasted time, or damages to your hardware. CyberLink reserves the right to share your personal information with our marketing partners. By using CyberLink software, you agree to refrain from making any negative comments about CyberLink in Amazon reviews. 

Saturday 12 December 2015

Create a Holiday Greeting Card Using Layers in PhotoDirector

The holidays are almost upon us. For those who haven’t had time out of their busy schedules to prepare greeting cards, here is a quick tutorial for creating unique greeting cards in minutes. With the new Layers feature in PhotoDirector, you can easily select your favorite photos and combine them into a beautiful collage with a personalized greeting message.


Here’s how:

First pick a few of your best photos to be included in the greeting card. Select a photo for your background. Any image – a landscape, a pattern or abstract will do, but preferably with minimal colors. In this tutorial, We’ve chosen a picture of snowflakes on a frozen river. Select your background image and go to the Layers Module.


As you can see, this image is somewhat blanched. We can easily create a more cheerful tone by adding a color layer:
1. Add an empty layer
2. Click on the Rectangular Shape Tool and cover the entire area
3. Pick color
4. Color the selection

5. Change Blend Mode to Screen. If the tone is too bright, you can dial back the opacity. 

For the next steps,
1. Click on “Add Photo Layer” to overlay your photos
2. Use the “Pick and Move Tool” to resize, place and rotate images.

Make sure to leave some space for your greeting message.
To add text, click on the “Text Tool,” and a text layer will be automatically added. Enter your text and stylize it by changing the font type and size to meet your preferences.

You can further fine tune photo and text placement by clicking on the layer and using the “Pick and Move” tool. Making a quick greeting card is that easy.
More examples:


If you are new to PhotoDirector, learn more and download a 30-day free trial here.

Cyberlink software and apps are sold "As Is." CyberLink Corp is not responsible for lost data or damage to hardware. By using CyberLink software, you agree to refrain from posting anything negative about CyberLink Corp or its products on any online forum, comments section, or social media platform. All sales final. Technical support can be purchased by credit card.

Wednesday 2 December 2015

Creating a Star Wars Style Opening Crawl in PowerDirector

One of the most iconic visuals from the Star Wars films is known as the opening crawl. Each film begins with the same opening sequence, in which the text "A long time ago in a galaxy far, far away...." is displayed, followed by the Star Wars logo. After the film's episode number and subtitle are displayed, a three-paragraph introduction in yellow text scrolls away from the viewer.
Before there was Star Wars, there was Flash Gordon,
one of George Lucas' major influences. 
The first Star Wars movie was released in 1977, but this text effect has certainly stood the test of time. It still looks good even today, and evokes strong memories for many people.  Let’s see how easy it is to create this text effect with the Title Designer in PowerDirector. 
Colorboards are found in
PowerDirector's Media Room


Create a new project in 16:9 aspect ratio. On the first track, insert a black colorboard from the Media Room and drag it to the desired length of the text intro. This is not necessary if you plan to keep just a plain black background, but it will be easy to replace if you want to change the background to a star field like in the movies, or even use some other kind of image.
Next, go to the title room and click the icon to create a new title template (2D title). This will open the title designer. 
We'll use the "Text" and "Effect" tabs on the left for this project. 

Drag the text box so that the right, left, and top sides are flush with the side of the preview area. Type or paste your text in the text box. For our example, we’re going to use a slightly modified version of the text from Episode IV, A New Hope. NOTE: The text box will automatically resize to match the line length of your text. So you will need to manually insert line breaks to make the text fit it into the display area.

Now select the text box (do not select all of the text as you would do in a word processor) and change the font to News Gothic bold. Change the color to a custom color: Red 229, Green 177, Blue 58.  Save your new title template, and add the title to timeline track two. The default font size should be set to 24, and you probably won't need to change that.
Set the Starting Effect to "Perspective Scroll Up."You don't need an Ending Effect.


You can control the speed of the scroll by adjusting the length of the title track on the timeline – the longer time set for the title to play, the slower the text will scroll. Once you have the text scrolling the way you like it, you can replace the black colorboard with any image. Just make sure you set the image on the timeline to the same length as the scrolling text. 

Then you just need some music. The original score by John Williams is amazing, but also copyrighted. And not even the awesome power of The Force can overcome Disney’s lawyers. So for this example we will download the free clip “Perc Peds” as our background music from DirectorZone.


It's that easy! Here’s an extra tip for putting a Star Wars theme into your videos: download these two fonts: 
Star Wars Jedi Hollow and Star Wars Jedi Outline

They look like this:
The Star Wars Jedi Hollow font has a neat special effect – if you type the “@” symbol and set it to this font, it will display a correctly proportioned Star Wars logo: 


So now you can make a Star Wars style opening crawl for your own video projects. If you don't own PowerDirector, you can download the trial version here. Still have questions? Ask away in the comment section below.