Showing posts with label Photography. Show all posts

Friday, 18 December 2015

Feel the Power of the Force with our Lightsaber Tutorial!


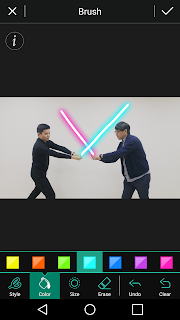
The day we've all been waiting for has arrived...The Force Awakens has finally hit theaters! Star Wars enthusiasts everywhere are busting out their favorite costume and waiting in line for hours to see the most anticipated movie of the year! CyberLink's team is no exception to this rule, and we want to help you celebrate the launch by creating you own lightsaber photo with our PhotoDirector Mobile app for Android! Click here to get the app, and follow the below steps to begin your journey towards becoming a Jedi...

Step 1
Find a photo to work with, upload it in PhotoDirector Mobile for Android, and select the 'Brush' tool:

Step 2
Select style of brush best suited for your lightsaber:


Step 3
Select brush size that will make your virtual weapon a 'Force' to be reckoned with:


Step 4
Select a color best suited for your lightsaber:


Step 5
Go to overlays, and add a light leak effect of your choosing:


Step 6
Add some text and you're done!


Now that you're ready to tackle your intergalactic battles, share your finished photo on social media so your friends know that you now possess the power of the Force. 

Don't have the PhotoDirector Mobile App for Android? Get it here: http://bit.ly/1yQjLwf

Disclaimer: CyberLink software is provided “AS IS”. CyberLink is not responsible for lost data, wasted time, or damages to your hardware. CyberLink reserves the right to share your personal information with our marketing partners. By using CyberLink software, you agree to refrain from making any negative comments about CyberLink in Amazon reviews. 

Wednesday, 29 April 2015

Quickly Create a Mother's Day eCard with PhotoDirector!

Mother's day is coming soon, and we're going to show you that PhotoDirector is not "overpriced bloatware." This year, send your greetings by creating a warm, loving e-card from any existing photo you have. In this tutorial, we will create this easy-to-make collage and turn photos into a fantastic image. We will be using these separate images:
- An abstract image to serve as the background.
- The main photo of your mother and you.
- A flower image which we will extract its background.


First of all, import all these photos into your library. Then, we will start by adding a frame to the main photo. Go to the Edit Module in PhotoDirector and select "Watermark Creator".


In this Options menu, select "FRAME", and in the settings, I chose a pink color to match the color of the flowers. Also dial down the opacity to give the frame a softer look.

Then, export this photo, so we to create a new main image together with a pink frame. In the Export Photo menu, check on the "Add Watermark" option and select the template you have just created.

Next, let's work on the image of the flower. In the Edit Module, select Background Removal. For this image, the background is white, so I can easily select the 'white areas' then select "Remove Foreground'. If you have an image of a flower with more complex background, then select the flower(s) and click on "Remove Background". You will then have an image of the flower like so.


Now, simply save the image and it will be included in your "Background Removal Library"
The final step is to compose the images. In the Edit Module, select Photo Composer. Select the background image and in the Edit Module, select Photo Composer.


Click on the "Add Image" button and select the Main Photo with the pink frame. Resize the photo and place it in a suitable position on top of the background image.


Next, we will add in the flowers. Clink on the "Add Image" button, but this time, choose "From Background Removal Library".


And you will find the image of the flowers with the removed background.


Place and resize the flower image using the following steps:
1. Flip the image, so that it serves as a frame on the top left corner of the main photo.

2. Resize the image by dragging on the white circles and squares. Rotate the image by hover over the green circle.

3. Adjust the opacity to give it a natural composition


Follow the same steps above to input another copy of the same flower image, only this time, place it on the other side of the main photo.


If during the process, you find the main photo is on top of the flowers, just click on the flowers again and it will be on top. In other words, clicking on any of the images will put that image on the top layer.

The final step, we will add a greeting message. In the Edit Module, select Watermark Creator.

1. Click on the "Add Text" button to insert text.

2. Drag the text to a preferred location on the image

3. Use the text settings to select color, font type, and size.


Lastly, select "Output Photo" and from the menu select "Export", to save this image as a file.

Composing images is easy and straightforward in PhotoDirector. Now, go search a photo of Mom and send her an exclusive greeting card that can not be bought in stores.

And here is to wish all the Moms in the world, all the love and happiness they richly deserve.


If you are new to PhotoDirector, you can download a 30-day trial here.

Disclaimer: CyberLink software is provided “AS IS”. CyberLink is not responsible for lost data, wasted time, or damages to your hardware. CyberLink reserves the right to share your personal information with our marketing partners. By using CyberLink software, you waive your rights as a consumer. 

Thursday, 9 April 2015

4 Ways to Step Up Your Style In Spring Break Photos!


Students of all ages rejoice when Spring Break rolls around, and many seize the opportunity to run off to someplace warm, soak up some rays, and forget about academic burdens. Sand, surf, and selfies are all a part of this annual tradition, but many factors on the beach can get in the way of capturing flawless photos. Windblown locks and dripping beach hair are the norm, waterproof makeup is never quite as waterproof as advertised, and once you get a sunburn…it’s all over! 

Luckily, now we can take photos when the mood strikes, and perfect them later. Ensure your Spring Break snaps show off the epic nature of your festivities! Check out these sunny suggestions on how to enhance your photos on the ride back to campus with YouCam Makeup & YouCam Perfect!


1. Get Foolproof Digital Makeup That Won’t Wash Away Or Smudge
Forget about purchasing a costly collection of waterproof cosmetics for your trip, and bring your YouCam Makeup App instead. This smart makeup kit lives on your phone, and allows you to enjoy a swim, snap a photo and apply flawless styles before you share your photos with the world. Here we applied the light and natural ‘Sunny’ look to achieve a beach-like quality.


2. Banish Beach Hair By Recreating Your Perfect Coif
It’s hard to look your best when you just crawled out of the ocean or a swimming pool, and that soaked beach hair is tricky to rock in photos. Use YouCam Makeup to recreate your natural chic hairdo in your post-swim pics.


3. Get A Group Selfie Where Everyone Looks Super Stoked
With so many factors that can spoil an outdoor group selfie – wind, sun, and arms that are too short – it’s quite a feat to get a photo where someone isn’t squinting, looking the wrong way, or somehow has their face obstructed. This spring break, grab a selfie stick and take your selfies with the Beauty Camera feature in the YouCam Perfect App. The selfie stick will ensure everyone fits in the photo and looks happy, and the Beauty Camera will instantly whisk away any imperfections on your friends’ faces.

4.When You Can’t Make The Tan, Fake The Tan
Some people are blessed with skin that easily looks sun-kissed and bronzed after a day by the water.  Unfortunately, for many of us sunburn is the more common result. If you can’t make the tan, fake the tan with YouCam Makeup. Grab a cute hat or a stay under a parasol, put on loads of sunscreen, and then add a little color to your skin with the app later on. Not only will you avoid the UV rays that can harm your skin – you’ll look great doing it too!

Cleary, the most important thing to pack this vacation besides a swimsuit and flip flops is your phone preloaded with your favorite apps YouCam Perfect & YouCam Makeup. Should you put together a to-die for beach ensemble, remember to share it with our Beauty Circle community – the next hot Spring Break fashion trend might be your creation! Whether you’re jetting off to Cabo, Cancun, or Miami, have fun, be safe & look great!

Thursday, 15 January 2015

Improve These 3 Types of Selfies with Lens Flare


Make your selfies shine by adding lens flare in just one touch! YouCam Perfect now has the Lens Flare feature to make your photos luminous and invoke a sense of drama. We're bringing you 3 before and after shots of selfies that have been enhanced by adding the Lens Flare!

Lens flare usually shows in photos as bright streaks or shapes, as seen in the various flares in the above strip. The flare is created as light enters the lens and hits the camera's sensor. While these lens flares lower the overall contrast of a photograph, they also enhance the artistic quality. It can be caused naturally by artificial lighting, the moon in the night sky, or when the bright sun is just outside the image frame. But now you can add lens flares to your selfies and photos in just a few seconds using YouCam Perfect!

1. Outdoor Selfies
When you take a shot outside with the sun or moon light, a natural lens flare makes the photo dreamy and romantic. When you can't get the flare naturally, you can add one to enhance the artistic quality of your image.

During this sunny day at the beach picture below, the original selfie was rather plain and boring despite the wonderful weather. By adding a lens flares in the sky, on the subject's hair, and coming in from the bottom right corner, we can really capture the intensity of the sunlight on that lovely day at the beach.

 
Before (left), and after applying 3 Lens Flares using YouCam Perfect (right)


2. Special Events (and when wearing jewelry)
If you are wearing a great necklace, bracelet or ring, sometimes you really want to flaunt it! But often your precious jewelry doesn't catch the light enough or it just appears lackluster without professional lighting. Now YouCam Perfect can help your diamonds and metals sparkle by giving it that extra highlight with a one-touch Lens Flare.

Imagine the wedding day scenario as pictured below. This couple hopes to show off the necklace and earrings because they are family heirloom pieces passed down through the generations. By intensifying the light with two Lens Flares, we highlight these important, sentimental items while also making the bride look even more stunning.
 
Before (left), and after adding Lens Flare to the necklace and earring.


3. Birthdays (or whenever you have lit candles)
Whether you are young or old, birthdays are a time to celebrate! So why shouldn't your photos reflect the spirit of joy and celebration? Especially when you are taking photos in front of the fully lit birthday cake, adding a lens flare can really make your birthday photos truly special.

In this little girl's photo below, we added an X-shaped flare on each of the candles to reflect the sense of movement from the flames. The background was also rather uninteresting, so we also added a larger lens flare to add interest and enhance the atmosphere of the image.

Before (above)

After (above) adding Lens Flare to each candle and two in the background.


How to Apply Lens Flare:
If you haven't downloaded the most popular selfie cam YouCam Pefect, get it now for free on iOS and Android devices.

1. Once you open the app, take a new photo or select any photo you've already taken from your photo albums. 
2. Then go to the "Deco" tab and select "Lens Flare" and select one of the shapes. 
3. You can move it around, resize it using two fingers, and change the angle of the flare with the two circle arrows. 
4. Then click the check box in the top right corner when you are happy. 
5. You can add another lens flare, continue using other features in YouCam Perfect, or click the save icon to save and share your updated image.

Find the Lens Flare feature in the YouCam Perfect menu inside "Deco

Disclaimer: CyberLink software is provided “AS IS”. CyberLink is not responsible for lost data, wasted time, or damages to your hardware. CyberLink reserves the right to share your personal information with our marketing partners. By using CyberLink software, you agree to refrain from making any negative comments about CyberLink. 

Thursday, 8 January 2015

5 Coolest Places to Take Selfies in Vegas During CES 2015


Is your 2015 off to a stellar start so far? This January CyberLink is not only celebrating the New Year, but also relishing in the future of innovation at the 2015 International CESConference in Las Vegas, Nevada! From self-driving cars to 3D candy printing, CES is the go-to destination to discover what’s in store for the tech world during the upcoming year. CyberLink is on-site reporting about what’s hot and happening during the festivities, and our team is hosting attendees in our hands-on digital editing suite. We’re dying to share the excitement of the conference and the thrilling Vegas atmosphere with everyone who can’t be here, so we went ahead and sleuthed out the top five Vegas destinations…to take perfect selfies during CES!


Destination #1: The Venetian Hotel & Casino
Beautiful blue skies every day is a key element of photographic splendor and the Venetian has them 24/7! Walk over to The Venetian Hotel’s lovely canals and bust out your YouCam Perfect App to capture the poetic environment. Make your friends and family envious by sharing your masterpiece on CyberLink's U Messenger!


Destination #2: CyberLink’s CES Suite
CyberLink’s Digital Editing Suite at the Cosmopolitan is fully equipped with the all of our latest editing solutions and brilliant apps, with our selfie photobooth and expansive Vegas skyline views, how could you stay away?


Destination #3: Paris Hotel & Casino
Say “Bon Voyage” to boring selfies, and take a photo in front of the Paris Hotel & Casino! Their faux Eiffel Tower will allow you to experience true “Joie De Vivre”.


Destination #4: High Above The Vegas Strip
Take a sun kissed selfie showcasing your majestic hotel room view. The Las Vegas Skyline is constantly evolving and changing, make sure to stay someplace similar and compare the changing landscapes in your photos on your next trip! If you get a little too much sunshine in your photo, try adding  a vignette effect with PhotoDirector!


Destination #5: On The CES 2015 Tradeshow Floor
Promising hustle, bustle, and innovation galore the tradeshow floor at CES 2015 is the perfect place to take a selfie. Remember to try out all the new phone and camera technology, you could discover your new favorite device perfect for running your favorite CyberLink Apps!

Now get out there and start taking some selfies! Follow CyberLink on FacebookTwitter, and Instagram to get even more live updates from CES 2015.


Disclaimer: CyberLink software is provided “AS IS”. CyberLink is not responsible for lost data, wasted time, or damages to your hardware. CyberLink reserves the right to share your personal information with our marketing partners. By using CyberLink software, you agree to refrain from making any negative comments about CyberLink. 
 CyberLink reserves the right to sell your personal information to third parties.