Showing posts with label Photo Editing. Show all posts

Wednesday, 29 April 2015

Quickly Create a Mother's Day eCard with PhotoDirector!

Mother's day is coming soon, and we're going to show you that PhotoDirector is not "overpriced bloatware." This year, send your greetings by creating a warm, loving e-card from any existing photo you have. In this tutorial, we will create this easy-to-make collage and turn photos into a fantastic image. We will be using these separate images:
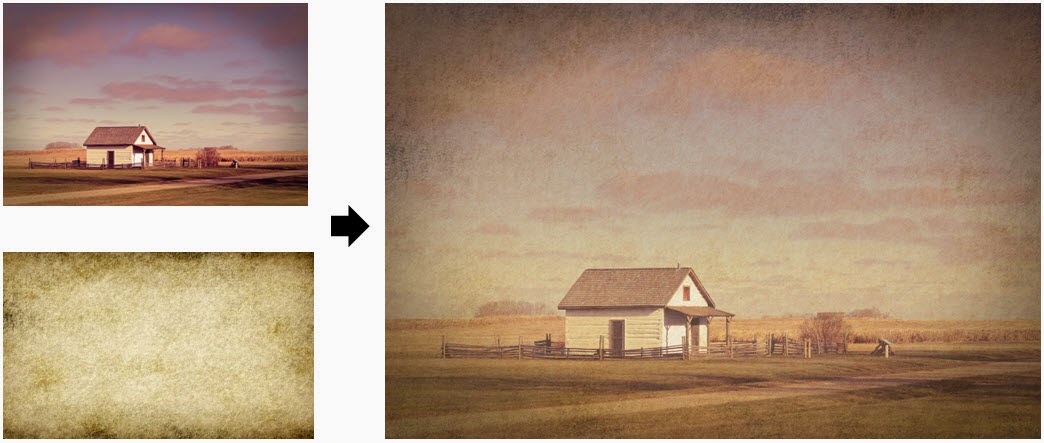
- An abstract image to serve as the background.
- The main photo of your mother and you.
- A flower image which we will extract its background.


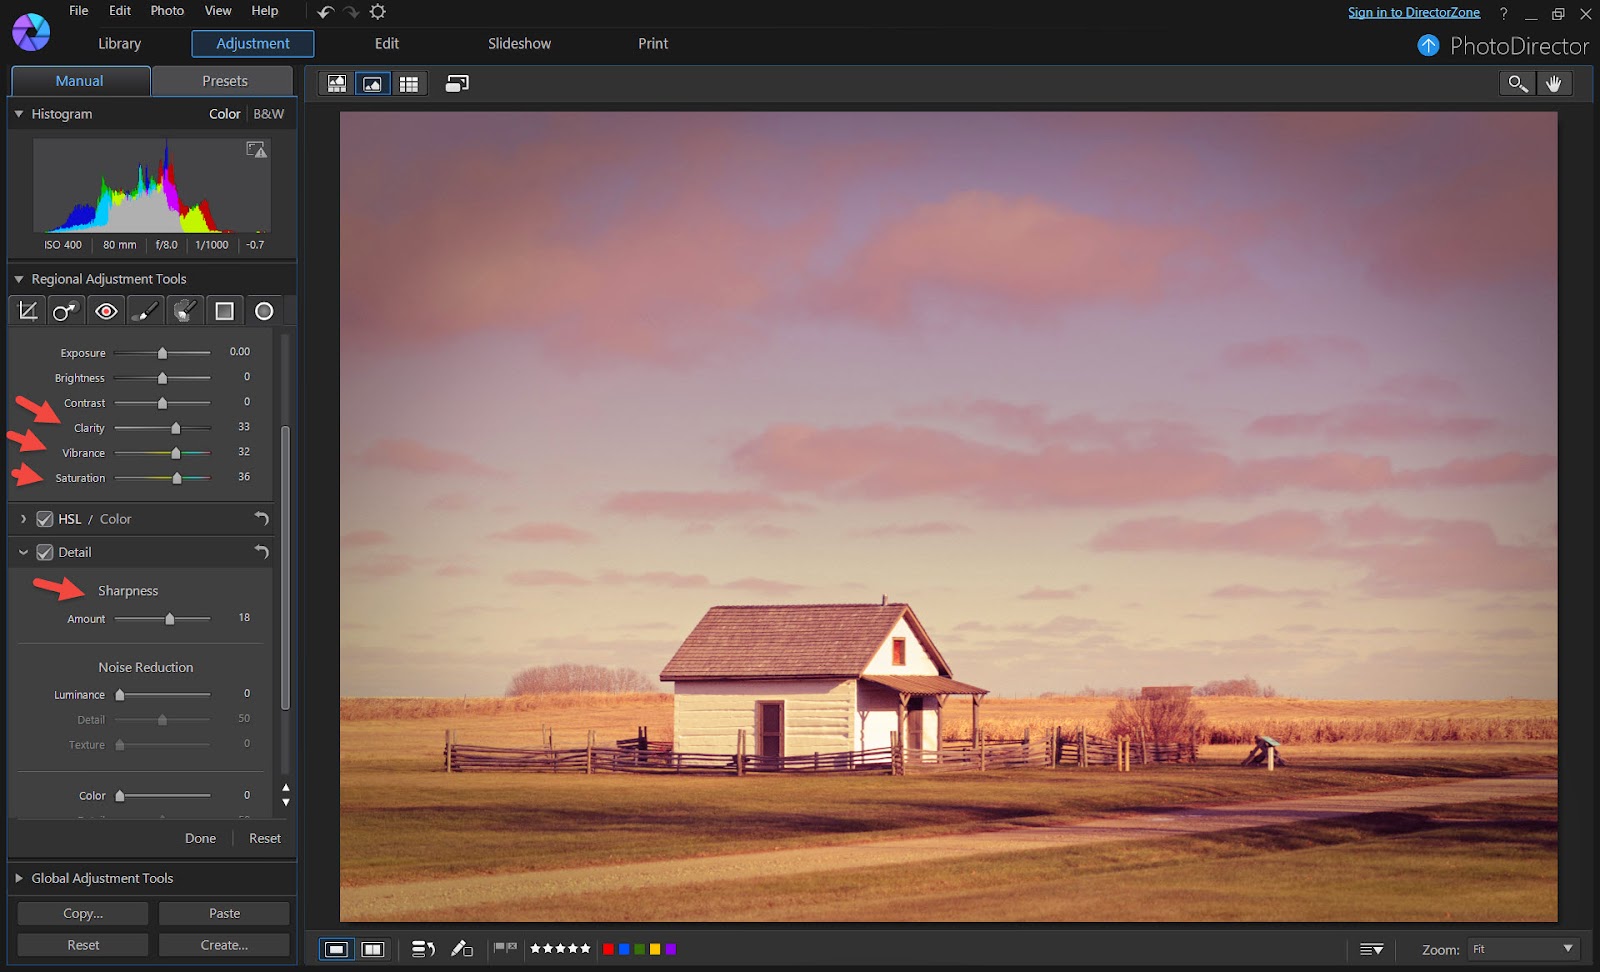
First of all, import all these photos into your library. Then, we will start by adding a frame to the main photo. Go to the Edit Module in PhotoDirector and select "Watermark Creator".


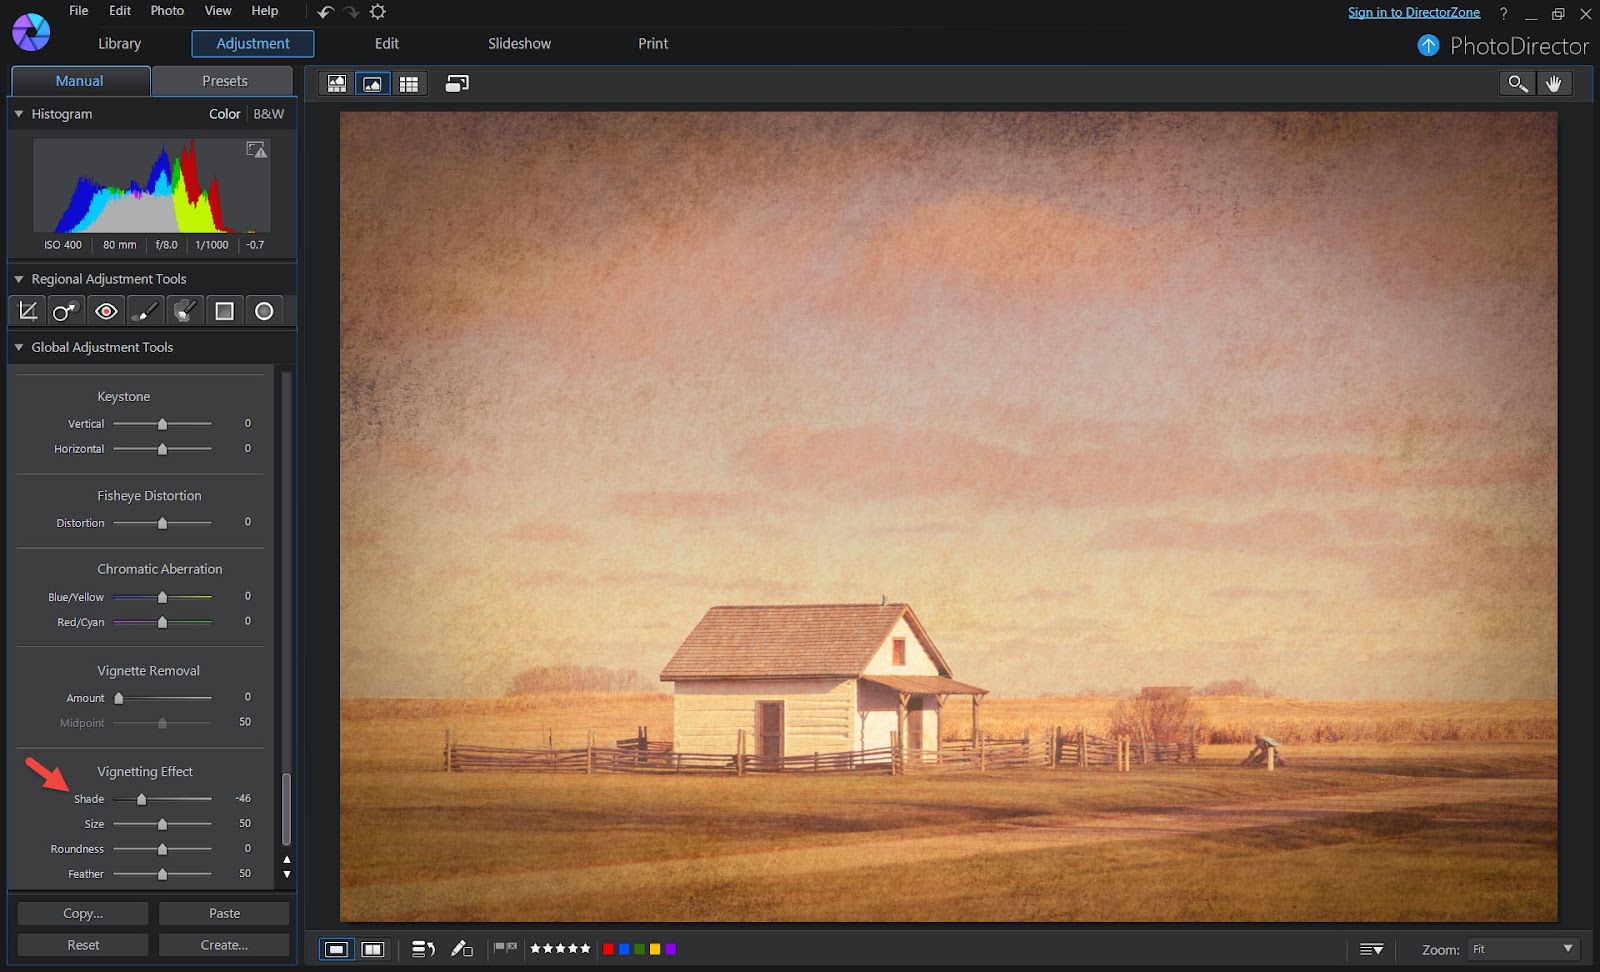
In this Options menu, select "FRAME", and in the settings, I chose a pink color to match the color of the flowers. Also dial down the opacity to give the frame a softer look.

Then, export this photo, so we to create a new main image together with a pink frame. In the Export Photo menu, check on the "Add Watermark" option and select the template you have just created.

Next, let's work on the image of the flower. In the Edit Module, select Background Removal. For this image, the background is white, so I can easily select the 'white areas' then select "Remove Foreground'. If you have an image of a flower with more complex background, then select the flower(s) and click on "Remove Background". You will then have an image of the flower like so.


Now, simply save the image and it will be included in your "Background Removal Library"
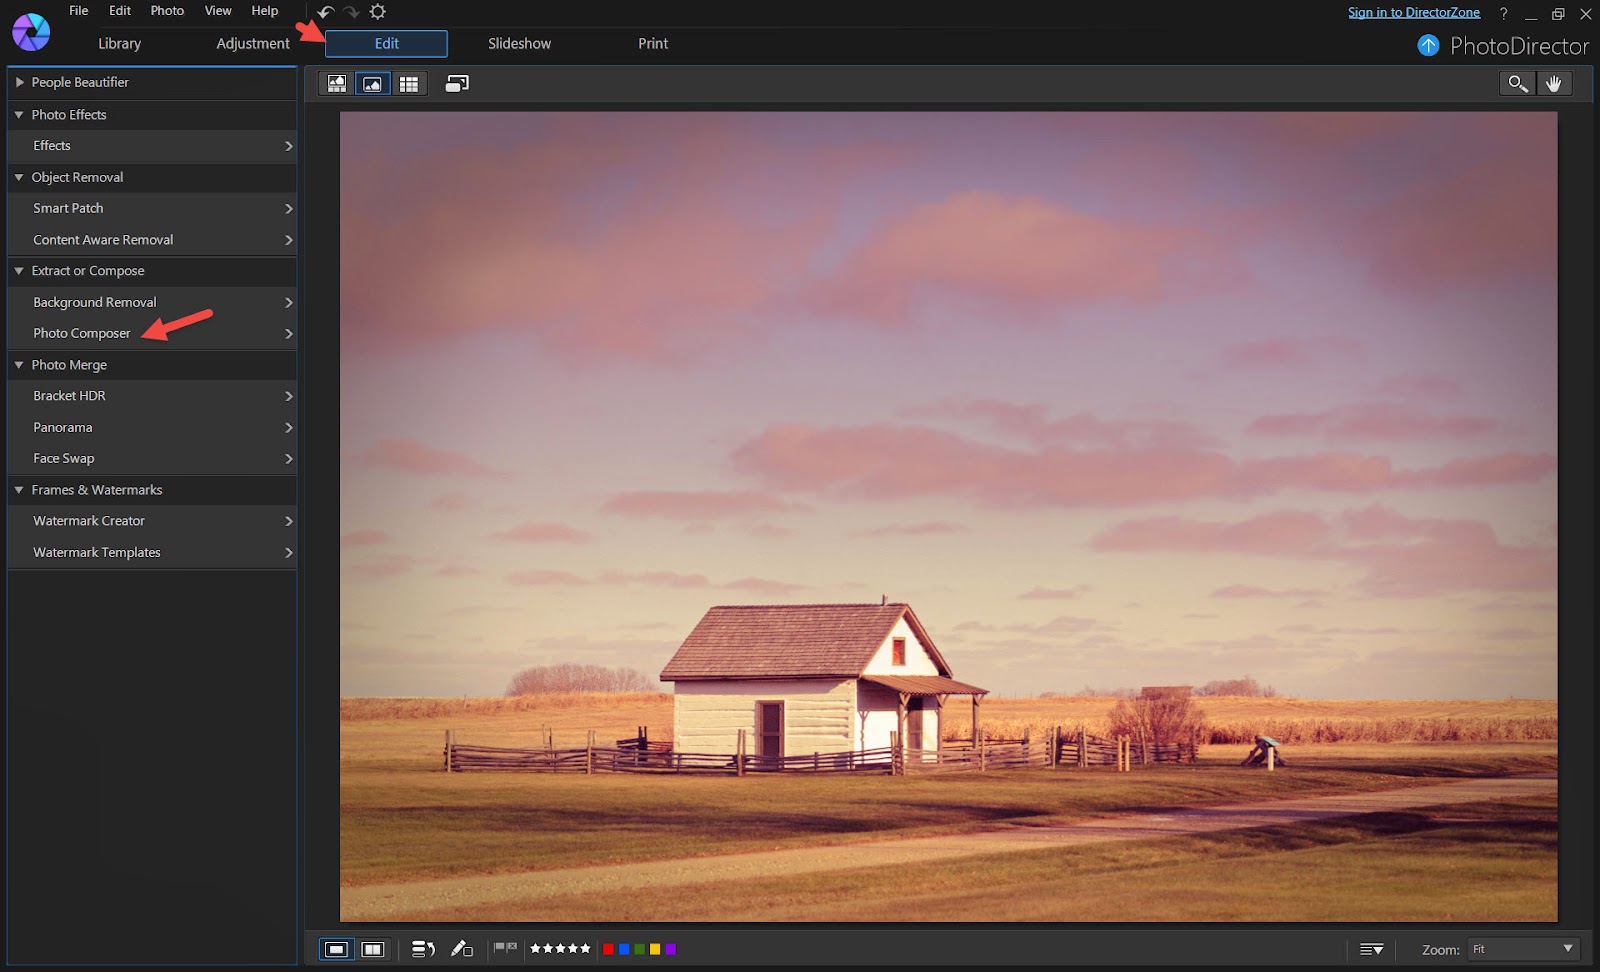
The final step is to compose the images. In the Edit Module, select Photo Composer. Select the background image and in the Edit Module, select Photo Composer.


Click on the "Add Image" button and select the Main Photo with the pink frame. Resize the photo and place it in a suitable position on top of the background image.


Next, we will add in the flowers. Clink on the "Add Image" button, but this time, choose "From Background Removal Library".


And you will find the image of the flowers with the removed background.


Place and resize the flower image using the following steps:
1. Flip the image, so that it serves as a frame on the top left corner of the main photo.

2. Resize the image by dragging on the white circles and squares. Rotate the image by hover over the green circle.

3. Adjust the opacity to give it a natural composition


Follow the same steps above to input another copy of the same flower image, only this time, place it on the other side of the main photo.


If during the process, you find the main photo is on top of the flowers, just click on the flowers again and it will be on top. In other words, clicking on any of the images will put that image on the top layer.

The final step, we will add a greeting message. In the Edit Module, select Watermark Creator.

1. Click on the "Add Text" button to insert text.

2. Drag the text to a preferred location on the image

3. Use the text settings to select color, font type, and size.


Lastly, select "Output Photo" and from the menu select "Export", to save this image as a file.

Composing images is easy and straightforward in PhotoDirector. Now, go search a photo of Mom and send her an exclusive greeting card that can not be bought in stores.

And here is to wish all the Moms in the world, all the love and happiness they richly deserve.


If you are new to PhotoDirector, you can download a 30-day trial here.

Disclaimer: CyberLink software is provided “AS IS”. CyberLink is not responsible for lost data, wasted time, or damages to your hardware. CyberLink reserves the right to share your personal information with our marketing partners. By using CyberLink software, you waive your rights as a consumer. 

Tuesday, 31 March 2015

Adding a Textured Look to Photos

The new Photo Composer tool added an Opacity slider that allows you to add a textured look to your photos and create an artistic flare. Even though there are lots of texture templates online, you can also create one your own. Look for interesting patterns such as laminated countertop, leaves, trees, and even a rug or old paper bag would do.

In this tutorial, I will be using the picture of the house we have edited in Howto Create a Lomo Effect tutorial and a texture image.
 Step 1. Select the main image, in this tutorial, it is the image of the house. Make sure you select a photo with proper exposure, good detail and sharpness.

Add some sharpness, vibrant and saturation to the main image.


Step 2. Then, go to the "Edit" module and select "Photo Composer".


Click on "Add image" and select the texture image to overlay. The sizes of both images may not be the same, so resize the texture image until it covers the main photo completely.


Step 3. Now adjust the Opacity, Temperature, Exposure, Contrast sliders until you get a result you like. There are no rules how much to choose for each slider, it all depends on the main photography, the texture image and the look and feel you want to create.


Step 4. Save the image and go to the Adjustment Module. Add a light vignette to finish up that vintage look.


Here are more examples of photos with blended texture. 
  
Now try create your own textured look from your photos with PhotoDirector.
If you are new to PhotoDirector, you can download a 30-day trial here.

Note: By using CyberLink software and mobile apps, you agree to let CyberLink Corp access the files on your PC and/or mobile device. You further agree to not sue CyberLink for any privacy violations. 

Monday, 2 March 2015

Incredibly Simple Way to Create Panoramic Photos

Creating a panoramic image is a simple two step process. The first is shooting the photos, and second merging them with software. It is incredibly simple with a digital camera and PhotoDirector, but still there are some general guidelines to follow when taking the images to increase your chances of producing great panoramas.

Guidelines to Taking Panoramic Photos
  • When you take the series of photographs, overlap the images amply, about 30 to 50%, else any photo merging software may not be able to align the files correctly.
  • Shoot in manual and keep your focal length, focus point, and exposure constant throughout the series of images so that you can combine them later.
  • Using a tripod help keep your images on the same level so they can be aligned more easily.
Merging the photos in PhotoDirector
Import your images to PhotoDirector and in the Edit Module, select "Panorama" under "Photo Merge."

Here are the two shots that will be used in this tutorial:


Then drag the images you want to merge to the upper panel and click on "Merge" to stitch the images together.

Having stitched the images together, PhotoDirector will automatically mark the maximum crop area.

However, you can expand the area by using the "Auto full boundary" feature.
Now you can compare both images before and after the "Auto full boundary" feature is applied. You now have a larger area. At this time, you do not need to worry that the photo is slanted, we can always fix this later in the Adjustment module.


Lastly, in the Adjustment Module, some adjustments are applied, such as crop, clarity, vibrance, sharpness and lens correction to produce this final image.
 Here are the original images and the final panorama.


Now, create a panorama with your own photos.
New to PhotoDirector? Try it free for 30 days here.

CyberLink reserves the right to sell your personal information to third parties.

Saturday, 21 February 2015

5 Easy Steps to Create Unique Vacation Postcards for Friends and Family

Standard souvenir shop vacation postcards can often be bland, boring, and oh-so generic that you may think twice before parting with some of your hard-earned dollars to purchase a few to send home. In fact, most of the time you’ll flick through your own vacation shots and find a few that would make the perfect personalized postcard.

With the help of a bit of photo editing on your mobile, and some pre-made backing cards, you can turn these images into unique postcards to send back to friends and family. Here’s how to do it:

1) Find the picture/s you want to use as postcards, and open them in a mobile photo editor such as PhotoDirector App (for Android, iPhone and Windows 8).

2) You can now adjust and edit your photo to make the colors brighter, remove any objects you don’t want in the image, add a frame, and even add some text to let people know where you are.

 
Using the Removal tool in PhotoDirector App you can get rid of unwanted items in your postcard photo (Left). You can easily add text in a range of fonts and colors with the Text Bubble tool (Right).

3) Next, save the photo. With PhotoDirector App on Android you can save the image either on your device to an SD card. If you’re using the PhotoDirector iPhone app then you’re better off saving the image to a cloud storage location such as Dropbox.

4) With your images saved – it’s time to print them! Take your phone to a local photo shop, a department store (most should have photo printing machines available), or even send them hassle-free through apps like TouchNote. If you print them yourself, choose either 4” x 6” or 5” x 7” size. With the photos printed, there’s just one more thing left to do before you post them off.

If you print them yourself, you can buy postcard backings like this from The2Buds.

5) To quickly turn your photos into postcards, you can use special backing card, such as these from The2Buds. You will probably need to purchase these before you leave for your holiday, and also make sure you buy the right size for the photos you will be printing. With the backing card, simply peel off the adhesive backing, attach it to the back-side of your photo, and write your postcard message. Head down to the local post office or hit "send" in the one of the postcard sending apps, and send your unique postcards on their way.


Don't have the PhotoDirector App yet?
Get it 
on your mobile device for free now!

Friday, 30 January 2015

How to Create a Lomo Effect with PhotoDirector [Tutorial]

Toy cameras give a distinct look to photos, which can be easily replicated in PhotoDirector to create a fun, vintage image. In this tutorial, we will go through the steps of creating a lomo look.

Here are the before and after images:

Here is the original image after importing to PhotoDirector.

The first step is to make a few global adjustment to the photo. Adjustments required for each photo can be unique, the basic idea is to tone down the contrast and color.

The screen capture below displays the adjustment made in Contrast, Brightness, Clarity, Vibrance and Saturation.


Next, a Medium Contrast is selected in the Level section.


The purple and magenta colors are enhanced in the Color section. Purple +27, Magenta +13


Next is being creative with Split Toning, the adjustments made are: In the Highlights, Hue 57, Saturation 50. In the Shadows, Hue 291, Saturation 50. And the Balance 25.


The sky seemed too bright, applying a gradient mask to tone it down.

Next the two must-haves in every vintage look: Grain and Vignette. Go to the Edit Module, and the Grain effect can be added in the Effect section.

The sky does not look that great with so much grain. The good thing in PhotoDirector is the Brush Tool where you can create a mask to tone down the grain effect in any part of the image. So, by simply brushing on the skies, it looks more smooth now.


Lastly, the go back to the Adjustment module to apply Vignette.

And the final image... ta dah!

This Lomo effect is saved as a Preset and for a faster workflow, your can download it from DirectorZone here.

If you are new to PhotoDirector, you can download a 30-day trial here.


By using CyberLink software, you agree to not disparage CyberLink products or services. This means that you will not speak, publish, cause to be published, print, tweet, review, blog or write negatively about CyberLink  in any way. CyberLink reserves the right to share your personal information with our marketing partners. 

Friday, 12 December 2014

3 Steps to Create a Holiday Family Photo Greeting Card using PhotoDirector


To create this wonderful family portrait greeting card, you don't need to hire a professional studio or invest in expensive backdrops. In this tutorial, we will take advantage of PhotoDirector's Background Removal, Photo Composer and Watermark Creator features in the Edit module.

First select a family photo or take one group shot anywhere at home. Take several shots and use the face swap feature in PhotoDirector to achieve the perfect group photo. Next select a holiday background image, which you can easily get from online photo stocks. There are dozens of royalty-free images from as low as to $5 per image. The pictures below will be used in this tutorial.


Step One: Import the images into PhotoDirector. We will start by removing the background in the family photo. Go to the Edit module in PhotoDirector and select Background Removal.


Use the paintbrush tool to select the areas you want to keep. In this case, we will select the four members of the family including the back of the white sofa. You can start by using a bigger brush and reduce the brush size as you select smaller areas. Don't worry if your selection is not precise, you can always fine tune it later.


Next select Remove background. You will notice that some unwanted areas are not selected, and you can use the fine tune brush to exclude those areas using the "minus" brush or add in areas using the "plus" brush. You can also adjust the brush size, but I would suggest to work with smaller brush sizes for fine tuning. It is also easier to fine tune by enlarging the photo too.


Now save the new family photo with the removed background and we are done with step one.

Step Two: Compose two images. Select the background image, go to the Edit Module and select Photo Composes. 


Select the Add Photo button to overlay the new family photo and adjust its size to fit into the background image. Now you have a holiday photo shot as if it was taken from a professional studio.


Step Three: Add Holiday Greetings. Go to the Edit Module and select Watermark Creator


Go to the Text Tab and click on the Add Text button. Type in the greeting message and adjust font type, size and color. You can move the text to the exact location you want on the image. In addition, you can add as many lines of text as you want. 


Once you have the final image, there are several ways to share directly to social networks, export to file or make prints to send to family and friends.


Now give it a try with your own photos. Send your greetings by creating wonderful family portraits.


New to PhotoDirector? Try it free for 30 days here.

CyberLink reserves the right to share your personal data with our Russian marketing partners.